
History
I bought this cheap babe to supplement what I already owned: a mid-sized Black & Decker 2-speed hammer drill and a larger Bosch variable-speed bi-directional hammer drill. I needed the IKEA FIXA to help do odd jobs without the inconvenience of using heavier drills in confined spaces.
Soon I discovered that the FIXA was the McDonald of drills—it partially filled a need but without much satisfaction. The battery drained fast and for some jobs I again reverted to using my other bulkier babes.
ROBBERY, ASSAULT AND BATTERIES
There came a fateful day when the internal batteries of the FIXA peacefully passed away during sleep. To find out what kind of rechargeable batteries lived inside, I opened up the machine.
The batteries looked like oversized AA (1.5 volts) babes but were actually type 18650 (3.7 volts each or total 7.2V/1.5Ah). I sourced new batteries from the local electronics market, hoping they exceeded the 1500 mAH (milli-Ampere hour) rating of the original ones.
The poorly documented User Manual of the FIXA neither mentioned anything about the battery type nor their rating, which meant they did not want one to replace them but rather follow the IKEA philosophy behind disposal furniture.
The marking on the original batteries was:
MNKE IMR-18650 (MH46608 RoHS)
Nevertheless, I charged the new batteries for several hours but the machine refused to work.
Feeling stuck, I resorted to searching for a newer cordless drill on Ali Express. The shops sold drill for around $40 each but charged $300 as freight because the Li-Ion batteries needed special handling and packaging due to their dangerous chemical composition.
During air-travel, the airlines check-in counters and the airport security personnel do NOT want passengers putting these Li-Ion batteries in checked baggage but rather hand-carrying them. Carrying more than normal quantities of these batteries also raises suspicions and objections—unless you happen to be a serious photographer with fantastic convincing power.
Hit and trial
I tried hard to put the fallen nine gears in place but failed. Taking the FIXA to various drill machine repairsmen proved futile and there was nothing on YouTube that seemed to help.
Frustrated almost to the point of throwing away the FIXA, I took the machine apart to investigate. The least I could do was embalm it (grease) and dress it in Sunday-best (clean-up) before cremating it with great respect.
Indian Jones and the temple of gears
Forgive me for not taking any photos of this effort and enjoy just the text below for technical salvation.

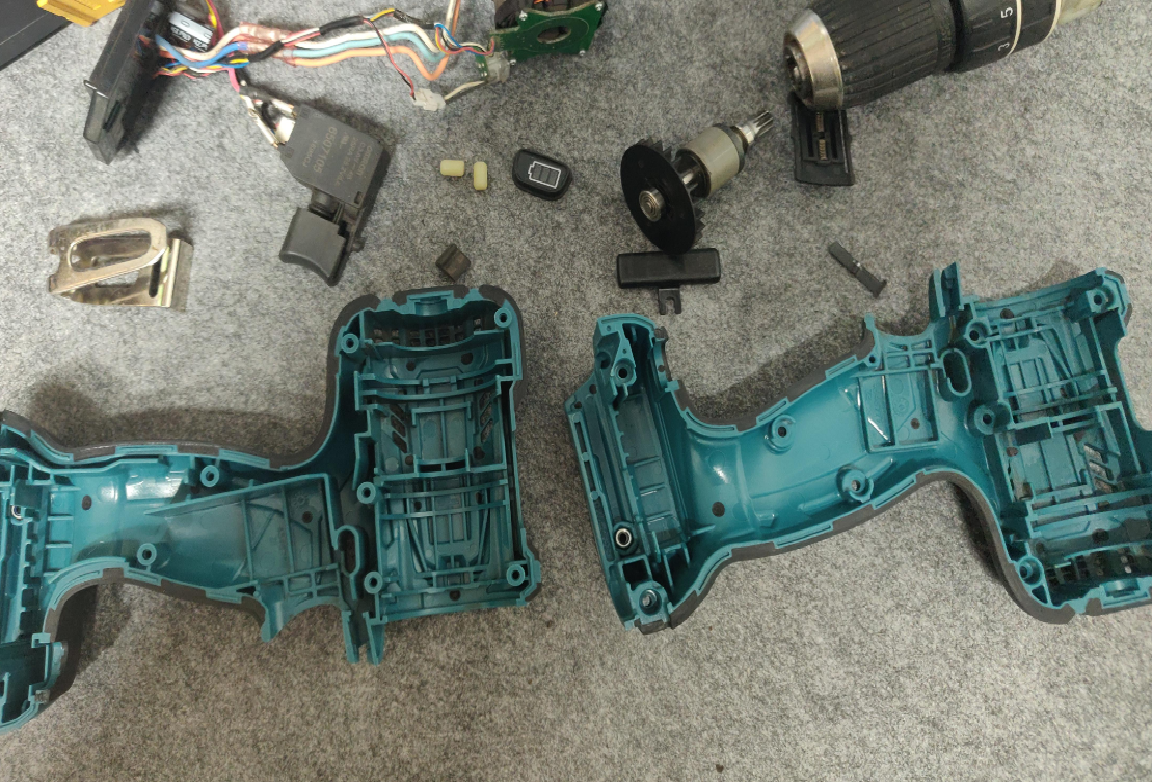
1) The drill body is composed of two sides held together by seven Philips (cross-head) screws. Place the machine on its left side over a table and start unscrewing using a Philips screwdriver. Use the correct-sized tool to prevent damage to the screw-heads. Carefully lift up the entire right side of the body by lightly prying open with a flat-head screwdriver.
2) Inside the handle grip are: the charger socket, two batteries, a trigger button and its control module.
3) On the upper portion are three components screwed together:
a) A motor that drives using 7.2V power (3.7V + 3.7V) of the batteries.b) A plastic unit that contains a metal barrel with nine interlocking gears (toothed wheels).c) A keyless chuck assembly that holds the drill bits.
4) Inside these three main parts are more parts. The motor's front is screwed to the rear of the plastic unit using four Philips screws. Separate the two while holding both horizontally and without jerking.
5) The plastic unit contains a metal barrel with horizontal grooves and nine interlocking gears.
6) Between the motor (on the left) and the plastic unit (on the right) are a felt gasket and a metal washer. Placed atop the motor's centre is a single gear connected to a shaft below that rotates when the drill's trigger is pressed.
7) When I pressed the trigger, this gear spun, which told me that the motor and the batteries worked but the nine interlocking gears or the chuck had issues.
8) I wiped the greasy parts first with a paper towel and then degreased them with Spray Nine's Grez-All liquid spray which required washing off. Degreasing aerosols are also available that clean and then evaporate immediately, leaving no residue behind.
9) Over and around the single gear in the centre of the motor assembly, I used SUPER LUBE multi-purpose synthetic grease with PTFE, an American heavy-duty grease. It's white, multi-purpose (without silicone but with PTFE added), four times longer lasting, corrosion//water/rust resistant, has a wide-temperature range and is NLGI GC-LB approved grade-2.
10) I first sprayed some WD-40 into the lone gear's shaft to smoothen it and then some specialist contact cleaner. The latter was also sprayed into the rear of the motor's cavity where I could see something turning, and also in the trigger. One should always be a smooth operator.
11) Operate the drill, if possible, to check for a smoother-sounding motor.
12) Holding the drill horizontal, I carefully separated the gear-chuck assembly, ensuring the gears didn't fall out. Inside were three gears mounted on three pins at the top of a round metal plate (inside the metal grooved-barrel in the plastic unit).
13) Three more gears could be seen sitting over three pins at the bottom of this first round metal plate (inside the metal grooved-barrel in the plastic unit).
14) These three gears faced a second round metal plate below, and which again had three gears mounted on three pins.
15) These six gears (3+3) faced each other and were interlocked to spin together. This was important to note for later assembling.
16) I degreased, cleaned and then greased these nine gears, and other parts and surfaces.

17) At the base of the entire housing that held the round metal barrel and the nine gears, there were six holes. Each hole contained three steel balls (I missed measuring the diameter with a Vernier caliper) that sat one on top of the other.
At one point, eighteen dried up steel balls fell out due to dryness and goofy disassembly. I lost track of how the gears interlocked and where the steel balls went. Having these small balls fall on the floor means looking for them doggy-style under the furniture.
Considerable time was wasted during reassembly in trying to figure things out. Hopefully this article will help you stay on the right path.
The chuckling CHUCK
18) The chuck's front had a Philips screw that I turned clockwise to loosen. The chuck refused to come off. Bad, bad chuck.
19) The three pins of the plastic unit (on the side facing me) were screwed into the chuck assembly and required action from inside. I took the machine to a drill repairsman who used a broad metal file's front edge to unscrew (anti-clockwise turn) the pins while holding the chuck firmly. Not death but male strength did them part.

21) Actually the spring coil had become unpredictable due to being unseated and the metal washer had moved out of place which caused the eighteen steel balls to fall out of their six holes into the cavity below.
Everybody, assemble HERE!
22) All eighteen steel balls were mildly greased, then dropped using a tweezer, one by one (three each) into the six holes. This was better than playing golf.
23) With the bottom coil and the metal washer in place, the steel balls stood their ground. The plastic unit containing the steel balls and the chuck were reassembled by carefully inserting a metal clip that held them locked in place. The operation was hand-checked by rotating the torque selection ring.
24) One wire (out of the two) behind the motor became unsoldered during re-assembly. This was re-soldered. Both the wires had heat-shrink tubing over them to protect the terminals from jerks and dust.

After several years of dormant existence, the FIXA finally whirred into action. Agreed I spent time worth thousands of Rupees but looking at the happier side, I saved $50 plus $300 freight and learnt some new things in older age.
©Tahir Gul Hasan, 2025
